


Table of contents

No headings in the article.
What is Linux?
Linux is an open-source operating system kernel that serves as the foundation for numerous operating systems, commonly referred to as Linux distributions or distros. It was created by Linus Torvalds in 1991 and has since become one of the most popular and influential operating systems in the world.
Linux is known for its stability, security, and flexibility. It is designed to be highly customizable and can run on a wide range of hardware, from smartphones and tablets to servers and supercomputers. Linux distributions offer various desktop environments, such as GNOME, KDE, and XFCE, providing different user interfaces and experiences.
One of the key features of Linux is its open-source nature. The source code of the Linux kernel is freely available, allowing developers to modify, enhance, and distribute it according to their needs. This has led to a vast ecosystem of software and applications developed by a global community of programmers.
Linux has been widely adopted in various domains, including web servers, scientific research, mobile devices (Android is built on Linux), embedded systems, and even desktop computers. Many well-known Linux distributions exist, such as Ubuntu, Debian, Fedora, CentOS, and Arch Linux, each with its own characteristics and target audience.
Overall, Linux offers a powerful and versatile operating system that empowers users with control, customization, and the ability to harness the collective efforts of a vibrant open-source community.
Flavors of Linux :
Linux is an open-source operating system kernel that serves as the foundation for various Linux distributions (commonly known as "distros"). These distributions come with different software packages, desktop environments, and configuration options, making them suitable for various purposes and user preferences. Here are some popular Linux distributions and their notable characteristics:
Ubuntu: Ubuntu is one of the most widely used Linux distributions, known for its user-friendly interface and focus on ease of use. It comes with the GNOME desktop environment by default, although there are official flavors like Kubuntu (KDE), Xubuntu (Xfce), and Lubuntu (LXQt) that use different desktop environments.
Fedora: Developed by the Fedora Project, Fedora is a community-driven distribution that aims to showcase the latest in open-source software. It focuses on innovation, security, and new technologies. Fedora uses the GNOME desktop environment by default but also supports other environments like KDE Plasma, Xfce, and LXQt.
Debian: Debian is a stable and versatile distribution known for its robustness and commitment to free and open-source software. It has a reputation for being one of the most reliable and secure distributions. Debian offers several desktop environments to choose from, including GNOME, KDE Plasma, Xfce, LXDE, and MATE.
Arch Linux: Arch Linux is a lightweight and highly customizable distribution that follows a "do-it-yourself" philosophy. It provides a minimal base system and allows users to build their desired environment from scratch. Arch Linux employs a rolling release model, which means you continuously receive updates without the need for major version upgrades.
CentOS: CentOS (Community Enterprise Operating System) is a distribution based on the sources of Red Hat Enterprise Linux (RHEL). It aims to provide a free, community-supported alternative to RHEL with long-term support and stability. CentOS is commonly used for servers and enterprise environments.
Linux Mint: Linux Mint is a beginner-friendly distribution that focuses on simplicity and providing a familiar desktop experience. It comes with the Cinnamon desktop environment by default, which offers a traditional desktop layout. Linux Mint also offers versions with the Xfce and MATE desktop environments.
openSUSE: openSUSE is a stable and user-friendly distribution that emphasizes ease of use and system administration. It provides different editions, including Leap (based on SUSE Linux Enterprise) and Tumbleweed (a rolling release). openSUSE supports various desktop environments such as KDE Plasma, GNOME, Xfce, and LXQt.
These are just a few examples, and there are numerous other Linux distributions available, each with its strengths, target audience, and purpose.
What is kernel in Linux?
In Linux, the kernel is the core component of the operating system. It acts as an interface between the hardware and the software, managing system resources, providing essential services, and enabling communication between different parts of the computer.
The kernel is responsible for various tasks, including:
Process management: It manages the execution of processes, allocating system resources such as CPU time, memory, and input/output devices.
Memory management: The kernel handles the allocation and deallocation of memory to processes, ensuring efficient memory utilization and protection.
Device management: It interacts with device drivers to control hardware devices such as disks, network interfaces, and input/output devices.
File system management: The kernel provides file system support, allowing processes to read, write, and manipulate files and directories.
Networking: It implements network protocols, enabling communication between different systems over a network.
Security: The kernel enforces security policies, controls access to system resources, and provides mechanisms for authentication and encryption.
Linux is an open-source operating system, and its kernel, called the Linux kernel, was initially developed by Linus Torvalds. The Linux kernel is continuously evolving, with contributions from a large community of developers worldwide. It serves as the foundation for numerous Linux distributions, which combine the kernel with additional software to create complete operating systems.
Basic Linux commands :
Below are some commonly used Linux commands with examples:
ls: Lists files and directories in the current directory.
- Example:
ls -l(displays files and directories in long format)
- Example:
cd: Changes the current directory.
- Example:
cd Documents(changes to the "Documents" directory)
- Example:
pwd: Prints the current working directory.
- Example:
pwd(displays the current directory path)
- Example:
mkdir: Creates a new directory.
- Example:
mkdir mydir(creates a directory named "mydir")
- Example:
rm: Removes files or directories.
Example:
rm myfile.txt(deletes the file "myfile.txt")Example:
rm -r mydir(deletes the directory "mydir" and its contents)
cp: Copies files and directories.
Example:
cp file1.txt file2.txt(copies "file1.txt" to "file2.txt")Example:
cp -r source dir dest dir(copies "source dir" directory and its contents to "destdir")
mv: Moves or renames files and directories.
Example:
mv file1.txt file2.txt(renames "file1.txt" to "file2.txt")Example:
mv file.txt mydir/file.txt(moves "file.txt" to the "mydir" directory)
cat: Displays the contents of a file.
- Example:
cat myfile.txt(prints the contents of "myfile.txt")
- Example:
grep: Searches for a specific pattern in files.
- Example:
grep "hello" myfile.txt(searches for the word "hello" in "myfile.txt")
- Example:
chmod: Changes the permissions of files and directories.
- Example:
chmod 755script.sh(gives read, write, and execute permissions to the owner, and read and execute permissions to the group and others)
- Example:
tar: Archives files into a tarball.
- Example:
tar -czvf archive.tar.gz files/(creates a compressed tarball named "archive.tar.gz" containing files from the "files" directory)
- Example:
wget: Downloads files from the web.
- Example:
wgethttps://example.com/file.txt(downloads "file.txt" from the specified URL)
- Example:
These are just a few examples of commonly used Linux commands. There are many more commands available with various options and functionalities.
Let's do some tasks:
Pre-requisite: Below are some basic steps for creating an EC2 instance via AWS Console
To create an EC2 (Elastic Compute Cloud) instance via the AWS Management Console, follow these steps:
Sign in to the AWS Management Console at console.aws.amazon.com.
Navigate to the EC2 service by either searching for "EC2" in the service search box or by selecting it from the list of services.
In the EC2 Dashboard, click on the "Launch Instance" button.
Provide a Name for the EC2 instance like my-linux-machine
Choose an Amazon Machine Image (AMI):
a. Select an Ubuntu Server 22.04 AMI that suits our requirements.
b. Click on the "Select" button after choosing the desired AMI.
Choose an Instance Type:
a. On the "Choose an Instance Type" as t2.micro which comes under the free tier.
Select an existing key pair or create a new key pair:
a. If you already have an existing key pair, choose the key pair from the list.
b. If you don't have a key pair, you can create a new one by selecting the "Create a new key pair" option.
c. Enter a name for the key pair and click on the "Download Key Pair" button. This key pair is needed to access your EC2 instance securely.
d. Make sure to keep the downloaded key pair file (.pem) in a safe place.
Review Instance Launch:
a. Review all the settings and configurations we have made for the instance.
b. If everything looks correct, click on the "Launch" button.
Launch Instances:
a. After selecting the key pair, click on the "Launch Instances" button.
b. The EC2 instance will now be provisioned based on your specifications.
View Instances:
a. We will be redirected to the Instances page, where we can monitor the status of our newly created instance.
b. Once the instance is in the "running" state, it is ready to be accessed.
That's it! We have successfully created an EC2 instance using the AWS Management Console. Now, connect to our instance using SSH (Secure Shell) or other appropriate methods, depending on the operating system we have chosen for our instance.
Task#1: Check your present working directory.
To check our present working directory, we can use the following command depending on the operating system you are using:

The pwd command stands for "print working directory." When you execute this command, it will display the absolute path of your current working directory.
Task#2: List all the files or directories including hidden files.
To list all the files and directories, including hidden files, we can use the following command, depending on your operating system:
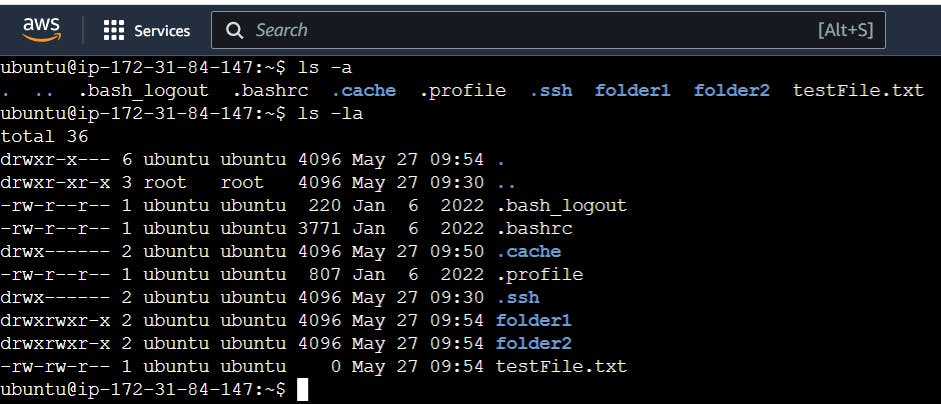
Let's break down the ls -a command:
- On Linux and macOS, the
lscommand is used to list files and directories. The-aoption stands for "all" and includes hidden files and directories in the output.
Task#3: Create a nested directory A/B/C/D/E.
To create a nested directory structure A/B/C/D/E, we can use the command line interface (CLI) or a terminal. Here's the command we can use:

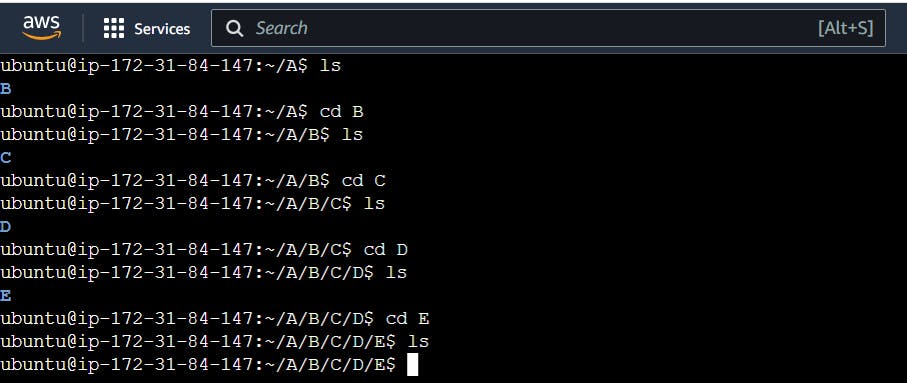
Let's break down the command:
mkdiris the command used to create directories (mkdir stands for "make directory").-pis an option that tellsmkdirto create intermediate directories as needed. Without this option, if any of the parent directories (A, B, C, D) don't exist, we would encounter an error. The-poption ensures that all parent directories are created automatically.A/B/C/D/Eis the path to the nested directory structure we want to create. Each directory name is separated by a forward slash (/), representing the nested structure.
After executing this command, we will have a nested directory structure with the directories A, B, C, D, and E created inside each other.
Thanks for Reading!
Keep Learning...